Do It Yourself Gift Box: Craft Your Unique Surprise
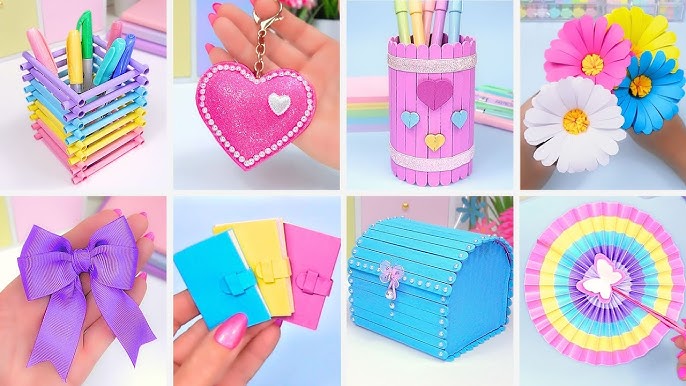
Looking for a special way to show you care? A Do It Yourself Gift Box is the perfect answer.
You get to create something unique, personal, and full of meaning. Imagine the smile on your loved one’s face when they open a gift made just for them by you. You’ll discover simple steps and creative ideas to craft a gift box that speaks from the heart.
Ready to make your next gift unforgettable? Keep reading and let’s get started!
Choosing The Right Materials
Choosing the right materials for your DIY gift box sets the tone for the entire project. The feel, durability, and appearance all depend on what you pick. Making thoughtful choices here can save you time and make your gift stand out.
Paper And Cardstock Options
Start with selecting the base material for your box. Cardstock is sturdy and holds shape well, perfect if you want a box that lasts. You can find cardstock in various weights and textures, from smooth to embossed.
Wrapping paper adds color and pattern but usually needs a stronger base underneath. If you prefer eco-friendly options, consider recycled paper or kraft paper—they add a rustic charm and are easy to work with. Ask yourself: do you want your box to be bold and bright or subtle and elegant? Your choice of paper will guide this.
Decorative Elements
Once you have your base, think about how to decorate it. Ribbon and twine can add a simple, clean touch that’s always effective. Stickers, stamps, and washi tape allow you to personalize without much effort.
Glitter and sequins catch the eye but use sparingly to avoid mess. Small dried flowers or leaves can give a natural look, especially if your gift is handmade or organic. Which decorative element reflects the personality of the person receiving your gift?
Tools You’ll Need
Having the right tools can make crafting your gift box easier and more precise. A good pair of scissors is essential, but a craft knife and cutting mat will help with clean edges. Don’t forget a ruler and pencil for accurate measurements.
Double-sided tape or glue dots work better than regular glue because they keep the paper neat and avoid wrinkles. If you want to get creative, a hole punch and eyelets can add a professional finish to your box. What tools do you already have at home that can save you a trip to the store?

Credit: www.soaphoria.sk
Designing Your Gift Box
Designing your gift box is a fun way to add charm and thoughtfulness. It sets the mood for the gift inside. A well-designed box shows care and effort. You get to decide how big or small it should be. The shape can match the gift’s theme or personality. Personal touches make the box unique and memorable.
Picking A Shape And Size
Choose a shape that fits your gift. Boxes can be square, rectangular, round, or even heart-shaped. Size matters. The box should hold the gift snugly but not too tight. Measure your gift first. Leave some space for padding like tissue paper or bubble wrap. Think about how the box will look when closed. A balanced shape feels nicer to hold.
Creating Templates
Templates help you cut materials accurately. You can find free printable templates online or make your own. Use cardboard or thick paper for sturdy boxes. Draw your shape on the material with a pencil. Cut carefully along the lines. Score the fold lines gently to make crisp edges. Test folding the template before gluing. Adjust any parts that do not fit well.
Adding Personal Touches
Decorate the box to show your style. Use ribbons, stickers, or hand-drawn designs. Write a short note or the recipient’s name on the box. Add small items like dried flowers or charms for extra appeal. Choose colors that match the gift or the person’s favorite hues. Simple details make your box stand out and feel special.
Step-by-step Assembly
Assembling your DIY gift box can be a rewarding experience. It’s where your creativity meets craftsmanship, turning simple materials into a charming package. Let’s break down the process so you can feel confident and enjoy every moment of putting your gift box together.
Cutting And Folding
Start with sharp scissors or a craft knife to get clean edges on your box template. Precision matters here—uneven cuts can make folding tricky and the box less sturdy.
Score the fold lines gently before folding to get crisp edges. A ruler and a blunt edge like a butter knife work well for scoring without tearing the paper.
Have you noticed how a well-folded corner instantly makes the box look professional? Take your time to fold each edge carefully.
Gluing And Securing
Choose a glue that dries clear and strong, such as tacky glue or a glue stick designed for paper crafts. Avoid using too much to prevent wrinkling or soaking through.
Apply glue sparingly along the tabs, then press firmly but gently to hold pieces in place. Clamps or clips can help keep everything secure while drying.
Have you ever had a box come apart because the glue wasn’t strong enough? That’s why patience during this step pays off.
Finishing Details
Add personal touches like ribbons, stickers, or hand-drawn designs to make your gift box unique. Small details show thoughtfulness and elevate the whole presentation.
Consider lining the inside with tissue paper or a soft fabric for an extra layer of surprise and protection. It’s a simple trick that makes a big impact.
What final detail will you add to make your gift box truly yours?

Credit: www.amazon.in
Creative Decoration Ideas
Decorating your DIY gift box is where your personality shines through. The way you dress up your box can turn a simple container into a memorable gift. Small touches often make the biggest impact, and you don’t need fancy tools to create something beautiful.
Using Paints And Markers
Paints and markers let you personalize your gift box with vibrant colors and designs. Try using acrylic paints for bold, lasting colors or watercolors for a softer, more delicate look. Markers are perfect for adding fine details, doodles, or even heartfelt messages.
Mixing patterns like stripes, polka dots, or geometric shapes can make your box stand out. You might experiment with stencils for clean shapes or freehand your own artwork. Have you ever tried painting a small scene or a favorite quote directly on a box? It adds a unique touch that no store-bought box can match.
Incorporating Ribbons And Bows
Ribbons and bows add texture and a sense of celebration to your gift box. Choose ribbons in different widths and materials like satin, burlap, or lace to match the occasion and recipient’s style. Wrapping your box with a contrasting ribbon color can create a striking look.
Try layering multiple ribbons or tying a bow in an unusual way to catch the eye. Adding a handmade fabric flower or a small charm to your bow can elevate the entire presentation. What kind of ribbon would make your gift box feel extra special to the person receiving it?
Adding Stickers And Embellishments
Stickers and embellishments offer a quick and easy way to decorate your box with personality. Choose from glittery stickers, metallic accents, or themed sets that reflect the recipient’s interests. Adding small gems, buttons, or dried flowers can give your box a tactile, three-dimensional look.
Arrange your stickers in patterns or clusters rather than randomly to create a balanced design. Sometimes, less is more—strategic placement of a few eye-catching embellishments can be more effective than covering the entire box. What small detail could you add that would surprise and delight the person opening your gift?
Filling Your Gift Box
Filling your DIY gift box is where creativity meets thoughtfulness. The contents you choose will shape the whole gift experience and show how much you care. Thoughtful selection and arrangement can turn a simple box into a memorable treasure.
Selecting Suitable Gifts
Think about the recipient’s interests and needs first. Choose items that match their hobbies or daily life—like a cozy pair of socks for someone who loves comfort or gourmet tea for a tea enthusiast.
Mix practical and fun items to keep the box exciting. Small, meaningful gifts often leave a bigger impact than expensive ones.
Arranging For Visual Appeal
How you place gifts inside the box matters just as much as what you put in it. Use tissue paper or shredded paper as a base to create layers and add texture.
Group similar items together and vary the heights to avoid a flat look. Your eye should be naturally drawn around the box, discovering each gift.
Including Personalized Notes
A handwritten note or a little card can make your gift feel truly special. Share a memory, a joke, or a simple message that connects directly to the recipient.
Try including instructions or ideas on how to use certain items to add a personal touch. It shows extra effort and makes the gift interactive.
Tips For Different Occasions
Creating a DIY gift box tailored to different occasions can turn a simple present into a memorable experience. The key is to match the box’s design and contents with the event’s mood and the recipient’s tastes. You’ll find that even small thoughtful touches make your gift stand out and feel more personal.
Birthday Surprises
Think about what makes the birthday person smile—favorite colors, hobbies, or even inside jokes. Use colorful tissue paper or confetti to add a festive vibe inside the box. Including a handwritten note or a small surprise like a mini photo album can make your gift truly special.
Don’t forget to add small, fun extras like candies, stickers, or a tiny keepsake that matches their personality. What’s one thing that always cheers them up? Adding that can create a meaningful connection beyond the gift itself.
Holiday Themes
Holiday gift boxes should reflect the spirit of the season. For Christmas, use red and green ribbons, pine sprigs, or tiny ornaments for decoration. For Halloween, consider spooky colors and a touch of orange or black with themed items inside.
Think about sensory experiences—like adding a scented candle or holiday-flavored treats. These elements can bring warmth and nostalgia, making your gift box feel cozy and festive. What holiday scent or taste instantly brings back your favorite memories?
Weddings And Anniversaries
For weddings and anniversaries, elegance is key. Choose soft colors like ivory, blush, or gold for wrapping and decorations. Including a small bottle of champagne, personalized keepsakes, or love-themed items can add a romantic touch.
Consider adding something that celebrates the couple’s journey, such as a custom map of where they met or a framed photo. How can your gift box tell a story about their relationship? Answering this will make your present unforgettable.
Sustainable Crafting Choices
Sustainable crafting choices transform your DIY gift box project from simple creativity into an eco-conscious act. Choosing materials and methods that reduce environmental impact not only benefits the planet but also adds meaning to your gift. How often do you think about the story behind the materials you use?
Eco-friendly Materials
Opt for natural fibers like cotton, jute, or hemp for wrapping or decoration. These materials break down easily and don’t leave harmful residues.
Look for recycled paper or cardboard as the base of your gift box. It’s sturdy and reduces the need for new resources.
Consider biodegradable glues and inks if you add personalized touches. They keep your project safe for the environment.
Recycling And Upcycling Ideas
Turn old newspapers or magazines into colorful wrapping paper or decorative accents. It gives new life to things you might have thrown away.
Use scraps of fabric from old clothes to make ribbons or liners inside the box. This adds a personal touch and keeps textiles out of landfills.
Have you ever thought about transforming a tin container or wooden crate into a gift box? These sturdy options can be reused by the recipient, extending their lifespan.
Minimizing Waste
Plan your box size carefully to avoid excess materials. A snug fit means less leftover scraps and a cleaner look.
Save small offcuts and leftover bits for future projects like gift tags or card decorations. This habit keeps your workspace tidy and reduces waste.
Try assembling your box with minimal adhesives or use reusable fasteners like ribbons and twine. It makes the gift easier to open and repurpose.

Credit: www.soaphoria.sk
Frequently Asked Questions
What Materials Do I Need For A Diy Gift Box?
You need cardboard or craft paper, scissors, glue, ruler, and decorative items. These basics help create sturdy and attractive boxes. Choose materials based on the gift size and occasion for a personalized touch.
How Can I Make A Diy Gift Box Look Professional?
Use clean cuts, precise folds, and quality materials. Add ribbons or printed labels for elegance. Attention to detail and symmetry enhance the overall presentation and make your gift box stand out.
What Are Easy Diy Gift Box Design Ideas?
Simple square or rectangular boxes work well. Try origami folds or themed decorations like floral or holiday patterns. Customize colors and textures to match the recipient’s style and the gift’s nature.
How Do I Size A Diy Gift Box Correctly?
Measure your gift dimensions accurately. Add extra space for padding or wrapping. Use a ruler and mark lines clearly before cutting to ensure the box fits snugly and protects your gift.
Conclusion
Creating your own gift box brings joy and personal touch. It shows care and effort in every detail. You can choose colors, shapes, and decorations freely. This makes your gift unique and special. Crafting a box also saves money and allows creativity.
It turns a simple gift into a memorable surprise. Try making one for your next special occasion. Enjoy the fun and satisfaction of DIY gift boxes. Simple, thoughtful, and full of heart.

Similar Posts