How to Make an Exploding Gift Box: DIY Surprise Magic
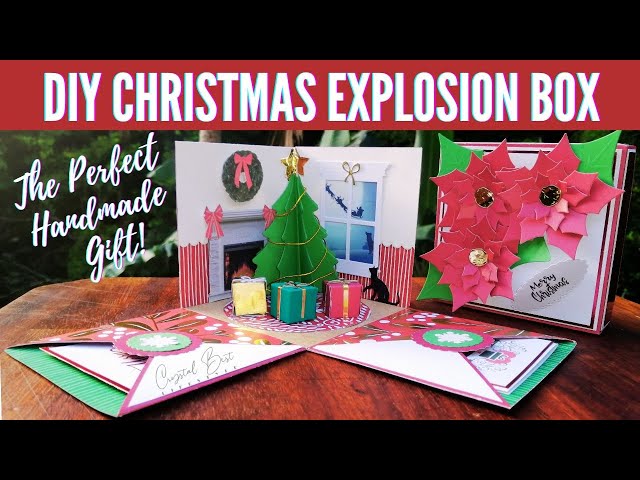
Imagine giving a gift that surprises and delights like nothing else. An exploding gift box does just that—it looks simple on the outside, but when opened, it bursts into a beautiful display filled with photos, notes, and little treasures.
If you want to wow someone special and create a memory they’ll never forget, you’re in the right place. In this guide, you’ll learn exactly how to make your own exploding gift box step by step. Ready to turn a simple present into an unforgettable experience?
Let’s get started!
Materials Needed
Gathering the right materials is the first step in making an exploding gift box that truly wows. Having everything ready saves you time and keeps your creative flow uninterrupted. Plus, using quality supplies can make a big difference in how your final box looks and feels.
Box Base And Lid
You’ll need sturdy cardboard or chipboard to create the base and lid of your exploding box. These pieces must hold their shape well to support all the layers and decorations inside. Don’t settle for flimsy materials—your box needs to feel solid when it opens.
Decorative Paper And Cardstock
Choose colorful or patterned paper to cover the inside and outside of your box. Cardstock works great for making pockets, flaps, and pop-up elements inside. Think about your recipient’s favorite colors or themes to personalize the look.
Adhesives And Cutting Tools
Strong glue, double-sided tape, and a good pair of scissors or a craft knife are essential. You want your pieces to stick securely without messy glue marks. A cutting mat can protect your workspace and help you cut straight lines.
Embellishments And Personal Touches
Adding ribbons, stickers, photos, or small trinkets turns a simple box into a memorable gift. These details show you put thought and effort into the surprise. What small items could make your box more meaningful to the person receiving it?
Optional Extras
Consider including foam pads for 3D effects or small LED lights for a wow factor. These extras can bring your exploding gift box to life, but only if you’re comfortable working with them. Have you ever tried adding lights to a paper craft before?

Credit: www.youtube.com
Choosing The Right Box
Choosing the right box is key to making an exploding gift box. The box must be sturdy enough to hold all the surprise layers. It should also be the right size for the gifts inside. Picking the correct box helps the final product look neat and impressive.
Material And Durability
Use thick cardstock or chipboard for the box. These materials hold their shape well. Thin paper or flimsy cardboard will not support the layers. The box needs to open and fold easily without tearing.
Size And Shape
Pick a square or rectangular box for best results. The size depends on the number of layers and gift items. A box too small will feel crowded. Too big will lose the surprise effect. Measure your gifts before choosing the box.
Lid Design And Fit
The lid should fit snugly but not too tight. It must hold the box closed until it is opened. A loose lid will spoil the surprise. Consider a separate lid or a folding flap style. Make sure it is easy to open without damage.
Color And Style
Choose a box color that matches the gift theme. Solid colors or simple patterns work best. Avoid overly busy designs that distract from the contents. The box style sets the first impression for the gift.
Cutting And Scoring The Panels
Cutting and scoring the panels is a key part of making an exploding gift box. It shapes the box’s structure and allows it to fold easily. Precise cuts and clean scores make the box look neat and professional.
Use a ruler and a craft knife for straight cuts. A scoring tool or bone folder helps create crisp fold lines. Take your time. Accuracy matters.
Choosing The Right Paper And Tools
Pick sturdy paper or cardstock for strong panels. Thin paper may tear or bend too much. Use a sharp craft knife for clean edges. A metal ruler prevents slips and keeps lines straight.
Measuring And Marking The Panels
Measure carefully to get the right panel sizes. Use a pencil to mark cutting and scoring lines lightly. Double-check measurements before cutting. Small mistakes can affect the box’s shape.
Scoring For Clean Folds
Score along the fold lines gently. Don’t cut through the paper. Use a bone folder or scoring tool. This creates a weak line that folds smoothly without cracking.
Cutting Out The Panels
Cut along the marked lines with a steady hand. Keep the blade perpendicular to the paper. Cut slowly to avoid jagged edges. Remove cut pieces carefully to keep the workspace tidy.
Folding Techniques
Folding techniques shape the heart of an exploding gift box. Precise folds create clean edges and smooth layers. This ensures the box opens perfectly, revealing its surprise inside. Simple folds transform flat paper into a three-dimensional treasure.
Start with sharp creases. Use a bone folder or the edge of a ruler. This helps keep folds crisp and neat. Avoid rough or uneven folds that may affect the box’s structure.
Creating The Base Folds
Begin by folding the paper into equal sections. These folds form the box’s base and sides. Use a ruler to measure and mark the fold lines. Fold each line inward, pressing firmly for a strong base.
Folding The Side Panels
Fold the side panels towards the center. This creates the walls that pop out when the box explodes. Make sure the panels align perfectly for a balanced look. Reinforce each fold with a sharp crease.
Making The Lid Folds
The lid requires careful folding to fit snugly on top. Fold the edges to create flaps that tuck inside the box. These flaps keep the lid secure but easy to remove. Press each fold firmly for a clean finish.
Adding Decorative Folded Layers
Layered folds add depth and style to the exploding box. Fold smaller squares or shapes and glue them inside. These layers can hold photos, notes, or small gifts. Use gentle folds to keep layers light and flexible.
Decorating The Box
Decorating the exploding gift box is where creativity shines. This step transforms a simple box into a special surprise. Focus on colors, textures, and personal touches to make it unique. The decoration sets the mood and adds excitement.
Using Wrapping Paper
Choose bright or patterned wrapping paper to cover the box. Smooth the paper carefully to avoid wrinkles or bubbles. Use double-sided tape for a clean look without visible tape lines. Layer different papers for a fun, textured effect.
Adding Embellishments
Decorate with ribbons, bows, or glitter to add sparkle. Use small stickers or cut-out shapes for extra detail. Glue on tiny charms or beads for a 3D effect. Keep embellishments light to avoid weighing down the box.
Personalizing With Photos
Print small photos of special moments to stick inside the box. Arrange them in a fan shape or a collage. Use colorful washi tape to frame each photo. Personal pictures make the gift box heartfelt and memorable.
Assembling The Layers
Assembling the layers is where your exploding gift box truly begins to take shape. Each layer adds depth and surprise, transforming a simple box into an unforgettable experience. Paying attention to how you stack and secure each piece will make your gift both sturdy and magical.
Preparing Each Layer
Start by cutting your cardstock or decorative paper to the right size for each layer. Remember, each layer should be slightly smaller than the one beneath it to create that iconic exploding effect. Use a ruler and sharp scissors or a craft knife to ensure clean edges.
Before you glue anything, fold each layer’s sides carefully to form crisp edges. This helps the box pop open smoothly. If you want to add extra flair, decorate the inside of each layer now—stickers, photos, or small notes work well.
Stacking And Gluing The Layers
Place the largest layer flat on your workspace. Then, apply glue along the bottom edges of the next smaller layer and center it on top. Press firmly but gently to avoid warping the paper.
Repeat this process for all layers, always making sure each one is perfectly centered. This keeps the box balanced and ensures it opens evenly. If you’ve ever had a gift box that collapsed or didn’t open right, misaligned layers were probably the cause.
Adding The Hinges
To make the layers fold correctly, add small hinge strips between each one. Use thin, flexible tape or paper strips glued only along the edges.
These hinges let the layers stay connected while allowing your box to explode open flat. Without them, the layers might separate or tear when the box is opened.
Final Touches For Stability
Once all layers are stacked and hinged, check for any loose edges and secure them with extra glue or double-sided tape. Adding a small weight, like a coin, to the center of the bottom layer can help your box sit nicely when closed.
Have you ever noticed how a well-assembled box feels solid in your hands? That’s the difference good assembly makes. Your effort here will shine the moment someone opens your exploding gift box and sees the surprise inside.
Adding The Surprise Elements
Adding the surprise elements to your exploding gift box is where the real magic happens. This is the moment you personalize the box and make it truly unforgettable for the recipient. Thoughtful touches turn a simple gift into an experience that brings joy and excitement.
Inserting Gifts
Choose small, meaningful gifts that fit comfortably inside the box layers. Items like jewelry, mini photo frames, or tiny keepsakes work perfectly. Arrange them so each layer reveals a new treasure, encouraging curiosity with every fold.
Think about the recipient’s hobbies or favorite things. Would they appreciate a small charm related to their passion, or maybe a handwritten coupon for a fun activity? This personal touch shows you’ve put real thought into their surprise.
Including Notes And Messages
Adding notes or messages inside the box makes the surprise even more personal. Write short, heartfelt messages or fun quotes on small cards. Slip them between layers or attach them to the gifts for an extra layer of delight.
Try using different colors or styles of paper to make each note stand out. You can even add clues or little jokes that relate to the gifts inside. What message would make the recipient smile or feel appreciated?
Adding Confetti Or Small Toys
Confetti brings instant celebration the moment the box pops open. Use colorful paper bits or themed shapes that match the occasion. Sprinkle them lightly so they don’t overwhelm the gifts, but add a festive touch.
Small toys or trinkets add a playful element. Think mini puzzles, tiny figurines, or even fun erasers. These extras make the unboxing fun and can become keepsakes themselves. What small surprise would make your recipient’s eyes light up?

Credit: m.youtube.com
Creating The Lid
Creating the lid for your exploding gift box is a crucial step. It keeps the box secure and adds to the surprise effect. The lid must fit perfectly over the base to hold everything inside until it’s opened. Use sturdy cardboard or thick paper for durability. Measuring and cutting carefully ensures a neat finish.
Choosing The Right Materials
Select a strong material that matches the box’s base. Cardstock or chipboard works well. Avoid thin paper because it tears easily. The lid needs to be firm but light enough to lift off smoothly.
Measuring The Lid Size
Measure the base width and length accurately. Add about 1/4 inch to both dimensions for the lid’s sides. This extra space allows the lid to fit over the box without sticking. Mark these measurements clearly on your chosen material.
Cutting And Folding The Lid
Cut out a square or rectangle for the lid’s top. Then cut strips for the sides. The side strips should be the same length as the lid’s edges. Use a ruler and bone folder to make crisp folds. Fold the strips up and glue them to the lid top’s edges.
Decorating The Lid
Make the lid look special with simple decorations. Use patterned paper, stickers, or stamps. Keep decorations flat so the lid closes easily. Personalize it with a name or a small tag for a nice touch.
Packaging And Presenting
Packaging and presenting your exploding gift box can make or break the surprise. The way you wrap and display it sets the mood before your loved one even opens the box. Paying attention to these details shows how much thought you put into the gift.
Choosing The Right Materials
Start with sturdy cardboard or craft paper to ensure the box holds its shape when it explodes open. You want materials that are durable but also easy to decorate. Don’t forget to pick a ribbon or twine that matches your theme—it adds a polished touch and keeps everything secure.
Adding Personal Touches
Use photos, stickers, or handwritten notes inside the box to make it feel special. Adding small keepsakes like charms or trinkets can make the surprise even more meaningful. Think about what your recipient loves and tailor the decorations to their personality.
Creating A Clean Opening Experience
Make sure the lid fits snugly but isn’t too tight—you want the box to pop open smoothly. Test the tension of the elastic bands or springs you use to create the explosion effect to avoid any frustration. Consider adding a small tag with a hint or a playful message to build excitement right before they open it.

Credit: www.abbikirstencollections.com
Tips For Making It Magical
Creating an exploding gift box that feels magical takes more than just folding and gluing. Thoughtful touches bring wonder and delight. Focus on colors, themes, and strong assembly. These tips help make your gift box truly special and memorable.
Color Coordination
Choose colors that match the occasion and recipient’s taste. Soft pastels work well for birthdays or baby showers. Bright, bold colors suit celebrations like graduations. Use two or three main colors to keep the design balanced.
Match the box’s outer color with the inside layers. This creates a seamless, pleasing look. Add small accents in a contrasting color to highlight details. Color coordination makes the box feel polished and well thought out.
Using Themes
Pick a theme that fits the event or person. Themes add meaning and make the gift box unique. Examples include travel, nature, or favorite hobbies. Use stickers, paper cutouts, and small decorations related to the theme.
Inside the box, include themed surprises like photos or tiny keepsakes. A clear theme guides your decoration choices and excites the receiver. It turns a simple box into a personal story.
Ensuring Secure Assembly
Strong assembly keeps the box intact until it’s opened. Use good-quality double-sided tape or glue. Avoid weak adhesives that may fail during handling.
Check every fold and joint for tightness. Reinforce corners with extra tape if needed. Test the box by opening and closing it gently. Secure assembly ensures the explosion effect works perfectly and surprises the receiver.
Frequently Asked Questions
What Materials Do I Need For An Exploding Gift Box?
You need cardstock, double-sided tape, scissors, ruler, and decorative items. Choose sturdy paper to ensure durability. Optional items include photos and stickers for personalization.
How Long Does It Take To Make An Exploding Gift Box?
Typically, it takes 30 to 60 minutes. Time depends on design complexity and decoration level. Beginners may take longer initially but improve with practice.
Can I Customize The Exploding Gift Box Design?
Yes, you can personalize colors, patterns, and decorations. Add photos, messages, or small gifts inside. Customization makes the gift unique and special.
Is An Exploding Gift Box Suitable For All Occasions?
Absolutely! It suits birthdays, anniversaries, weddings, and holidays. The box adds surprise and excitement to any celebration.
Conclusion
Making an exploding gift box adds fun to any celebration. It brings surprise and joy to the person receiving it. You only need simple materials and a little patience. Follow the steps carefully, and you will create a beautiful gift box.
Personalize it with your favorite photos or messages. Try making one for your next party or special event. Creativity and effort make your gift memorable and unique. Give it a try and enjoy the smiles it brings!

Similar Posts