How to Make Explosion Gift Box: Unleash Creative Magic
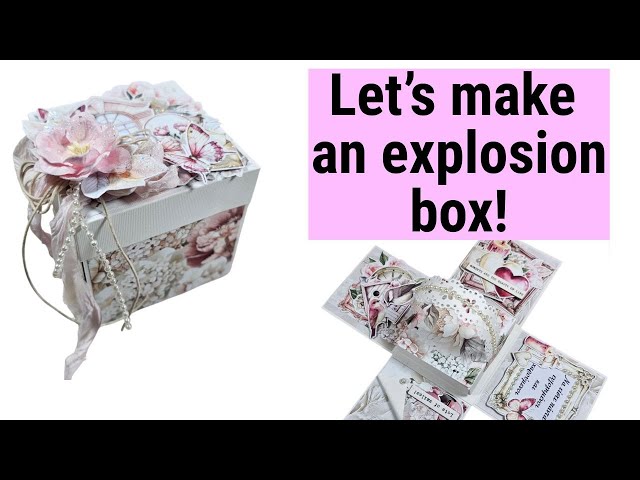
Looking for a gift that truly wows? Imagine opening a box that doesn’t just reveal a present but bursts into a stunning surprise.
That’s exactly what an explosion gift box does. It’s creative, fun, and perfect for making your special moments unforgettable. In this guide, you’ll discover simple steps to make your own explosion gift box that will leave your friends and family amazed.
Ready to turn a regular gift into an unforgettable experience? Let’s get started!
Materials Needed
Gathering the right materials is key to making an explosion gift box that truly wows. The quality and choice of supplies affect not only the look but also the durability of your creation. Let’s break down what you need to get started.
Choosing The Right Box
Your explosion box is the foundation of the whole project. Pick a sturdy cardstock or heavy-weight paper that can hold the layers and decorations without bending.
- Standard sizes like 6×6 inches or 8×8 inches work well for beginners.
- Consider colors and patterns that fit the occasion—solid colors make decorations pop.
- If you want a unique touch, try textured or metallic cardstock for added flair.
Have you thought about the theme or message you want your box to convey? This can guide your box selection and make your gift more personal.
Decorative Supplies
Decorations bring your explosion box to life. Choose a mix of materials that match your style and the recipient’s taste.
- Patterned scrapbook paper adds interest to the inner layers.
- Stickers, washi tape, and stamps help personalize each panel.
- Small photos, handwritten notes, or tiny charms create emotional impact.
- Glitter, ribbons, and buttons add texture and sparkle.
Think about what story your decorations will tell. What personal touches can you add to surprise your gift’s receiver?
Tools And Accessories
Having the right tools makes assembly easier and your project neater. Basic tools are often all you need.
- Sharp scissors and a craft knife for precise cuts.
- A ruler and pencil to measure and mark folds accurately.
- Double-sided tape or glue sticks to keep layers secure without mess.
- A bone folder or similar tool to create crisp folds.
Do you have a favorite tool that always helps you get perfect results? Sometimes a small accessory can make a big difference.
Preparing The Box Base
Preparing the box base is the foundation of your explosion gift box. Getting this part right ensures your box holds together beautifully and creates that wow factor when it opens. Careful measurement, precise folding, and a well-made lid will make your gift box both sturdy and stylish.
Measuring And Cutting
Start with a square piece of sturdy cardstock or craft paper. The size you choose depends on how big you want your explosion box to be.
- Measure a square, for example, 12×12 inches for a medium-sized box.
- Mark the paper into a 3×3 grid by measuring and drawing lines every 4 inches.
- Cut out the square carefully using a sharp craft knife or scissors to ensure clean edges.
Accuracy here makes folding easier and the box neater. Have you noticed how small mistakes in cutting can throw off your whole project?
Folding Techniques
Folding along the grid lines creates the panels that will fold up to form the box. Use a bone folder or the edge of a ruler to make crisp folds.
- Fold all the lines inward to create the base shape.
- Make sure the folds are sharp but gentle enough not to tear the paper.
- Test folding the box up to see if the panels align properly.
Folding can feel tricky at first, but once you get the feel of the paper, it becomes second nature. What’s your go-to tool for making perfect folds?
Creating The Lid
The lid needs to fit snugly over the base without being too tight. Start by cutting a slightly larger square, about 0.25 inches bigger on each side.
- Score the edges about 1.5 inches from each side to create flaps.
- Cut small slits on the corners to help fold the flaps into a box shape.
- Fold and glue the flaps inside to hold the lid’s shape.
Try placing the lid on the base as you work to check the fit. Have you ever made a lid that was too tight or too loose? Adjusting as you go saves frustration later.
Designing The Layers
Designing the layers of your explosion gift box is a fun and creative process. Each layer adds depth and surprise to the final reveal. Careful planning helps keep everything balanced and visually appealing. You can mix different sizes, shapes, and features to make every layer unique. This section guides you through making the layers stand out and fit perfectly.
Layer Sizes And Shapes
Choose sizes that fit well inside each other. Start with a larger base layer and decrease the size as you go up. Common shapes include squares and rectangles, but circles or hexagons add a special touch. Keep the height of each layer even for a neat look. Use sturdy cardstock to hold the shape well.
- Base layer: largest, strong support
- Middle layers: smaller, balanced
- Top layer: smallest, eye-catching
Adding Pockets And Envelopes
Pockets and envelopes add space for small gifts or notes. Attach them on the inside walls of each layer. Use glue or double-sided tape for secure attachment. Make pockets big enough to hold cards, photos, or little treats. Envelopes can hold secret messages or gift cards. This adds fun and interaction with the box.
- Place pockets evenly around layers
- Use different sizes for variety
- Keep openings easy to access
Personalizing Each Layer
Decorate each layer to match the theme or occasion. Use stickers, stamps, or hand-drawn designs. Add photos or small keepsakes for a personal touch. Write short messages on each layer to tell a story. Choose colors that complement each other. Personal touches make the gift box more meaningful and memorable.

Credit: www.youtube.com
Decorative Elements
Decorative elements transform your explosion gift box from simple to spectacular. They add personality and charm, making your gift unforgettable. Think about the feelings you want to evoke and choose decorations that tell a story or highlight a special memory.
Using Stickers And Washi Tape
Stickers and washi tape are easy and fun ways to add color and style. Pick stickers that match the theme or the recipient’s interests—like flowers, stars, or cute animals.
Washi tape comes in endless patterns and colors. Use it to create borders, frames, or even to hold small notes inside the box. It’s a quick way to add a polished look without much effort.
Incorporating Photos And Messages
Photos bring a personal touch that words alone can’t match. Print small, candid shots that capture happy moments you’ve shared with the person receiving the gift.
Write heartfelt messages on colorful paper or tags. Place them inside the box where they pop out when the box opens, surprising and delighting the recipient. What memories do you want to relive through your gift?
Adding Ribbons And Embellishments
Ribbons add texture and elegance. Choose satin, lace, or burlap ribbons depending on the vibe you want—soft and romantic or rustic and charming.
Embellishments like buttons, charms, or tiny flowers can make your box look handcrafted and unique. Attach these with glue or tie them into ribbons to create layers of interest that invite closer inspection.
Assembling The Explosion Box
Assembling the explosion box is where your creativity truly comes to life. It’s the moment to bring together all your prepared layers and decorations into a cohesive, delightful surprise. This process requires attention to detail so each part fits perfectly and the box opens smoothly, revealing your thoughtful design.
Attaching Layers Securely
Start by stacking your layers from largest to smallest. Use double-sided tape or glue dots to attach each layer firmly. Be careful not to use too much glue; it can cause the paper to warp or stick unevenly.
Make sure each layer aligns well with the one below it. This keeps your box neat and helps it fold properly. If the layers shift, your box may not close or open as intended.
Placing Decorative Items
Add your decorative items thoughtfully. Stick photos, notes, or small trinkets inside the layers using light adhesives. Heavy decorations can weigh down the box and disrupt its structure.
- Position items where they won’t interfere with folding.
- Leave some blank space to prevent clutter.
- Use pop-up elements sparingly to add surprise without bulk.
Have you considered adding personal touches like handwritten messages? These make the box feel more intimate and meaningful.
Ensuring Smooth Opening
Test the box as you assemble it by gently folding and unfolding each layer. If you feel resistance, check for glue spots or bulky decorations that might block movement.
Adding a small ribbon or a magnetic closure can help keep the box closed without damaging the paper. Think about how the recipient will handle the box—easy opening enhances their experience.
What small detail can you add to make opening your explosion box a moment of joy rather than frustration?

Credit: www.youtube.com
Creative Ideas For Themes
Choosing a theme for your explosion gift box can turn a simple present into a memorable experience. Themes help you tailor every detail, making the surprise more meaningful and personal. Think about the occasion and the recipient’s interests to create a box that truly stands out.
Birthday Celebrations
Birthdays offer a perfect chance to get creative with your explosion box. Use bright colors like reds, blues, or pinks depending on the person’s favorite shades. Add small photos, little notes, or tiny balloons to fill the layers with joyful memories.
You can include mini gifts like keychains or charms that match the birthday person’s hobbies. Ever tried making a pop-up cake inside the box? It’s a fun way to add a wow factor that your friend will never forget.
Romantic Surprises
A romantic explosion box can be a powerful way to show your feelings. Soft colors such as pastels, reds, and golds create a warm and intimate vibe. Inside, place love notes, pictures from special moments, or even tiny love coupons.
Consider adding small compartments for keepsakes like a ring or a lock of hair. Have you thought about writing a personal poem or a list of reasons why you love the person? These thoughtful touches make your box a treasure chest of affection.
Holiday And Seasonal Designs
Holidays give you endless inspiration for themed explosion boxes. For Christmas, use red, green, and white with mini ornaments or candy canes inside. Halloween boxes can feature orange and black tones with tiny spooky decorations or jokes.
Seasonal themes like spring or autumn work well too. Fill the box with flowers, leaves, or seasonal treats that connect to the time of year. What special holiday or season could you celebrate with a personalized explosion box this year?
Tips For Personal Touches
Adding personal touches to your explosion gift box transforms it from a simple present into a cherished memory. These small details show thoughtfulness and make your gift truly unique. Let’s dive into ways you can add that special flair.
Handwritten Notes
Nothing beats the warmth of a handwritten note tucked inside your explosion box. Your own handwriting adds a layer of intimacy that printed text can’t match. Try writing a short message, a favorite quote, or a shared memory to make the recipient smile.
Have you ever received a card that felt like it was written just for you? That’s the effect you want to create. Use colorful pens or different paper textures to make your notes stand out even more.
Custom Artwork
Adding your own drawings or paintings is a fantastic way to personalize your explosion box. Even simple sketches or doodles can convey emotions and make your gift one of a kind. If you’re not confident in your artistic skills, try using stamps or stickers that reflect the recipient’s personality.
Think about what the person loves—whether it’s flowers, animals, or a hobby—and create artwork around that theme. This makes your gift feel intentional and tailored just for them.
Incorporating Small Gifts
Small items tucked into the layers of your explosion box keep the surprise going. Miniature keepsakes like charms, photos, or tiny trinkets add depth and meaning. Choose items that relate to shared experiences or inside jokes to spark joy and nostalgia.
What small gift would make your loved one’s eyes light up? Maybe a favorite candy, a keychain, or a tiny book. These little treasures build excitement as the box unfolds layer by layer.
Troubleshooting Common Issues
Creating an explosion gift box can be fun, but some issues may arise. These problems can make your box look uneven or unstable. Understanding common issues helps fix them quickly. This keeps your project neat and enjoyable.
Box Not Folding Properly
Check the creases carefully. Use a bone folder or a ruler to make sharp folds. Paper that is too thick may resist folding. Try scoring the fold lines before folding. Ensure the paper size matches the template exactly. Avoid forcing folds, as this can tear the paper.
Decorations Falling Off
Use strong glue designed for paper crafts. Allow enough drying time before closing the box. Avoid heavy decorations that pull on the paper. Double-sided tape can help keep small pieces in place. Press decorations firmly when attaching. Keep decorations near the center to reduce stress.
Layer Misalignment
Align each layer carefully before gluing. Use a flat surface to stack layers evenly. Measure and cut layers precisely to match sizes. Add a small margin for error when cutting. Use clips or weights to hold layers while drying. Check alignment at each step to avoid bigger problems.

Credit: m.youtube.com
Frequently Asked Questions
What Materials Are Needed For An Explosion Gift Box?
You need cardstock, double-sided tape, scissors, ruler, and decorative paper. Optional items include stickers, ribbons, and photos for personalization.
How Do You Assemble An Explosion Gift Box?
Cut and score cardstock into squares, fold sides up, and secure edges. Layer smaller boxes inside to create the explosion effect when opened.
Can I Customize The Explosion Gift Box Design?
Yes, you can personalize colors, patterns, and decorations. Add photos, messages, or small gifts for a unique, heartfelt touch.
How Long Does It Take To Make An Explosion Gift Box?
It typically takes 30-60 minutes depending on design complexity and experience. Simple designs are quicker, while detailed ones require more time.
Conclusion
Making an explosion gift box is fun and creative. You only need a few materials and simple steps. Personalize it with photos or small notes to make it special. This craft brings joy to both the giver and the receiver.
Try making one for your next celebration or gift. Enjoy the process and watch the surprise on their face!

Similar Posts