How to Make Christmas Bows for Gifts: Step-by-Step Guide
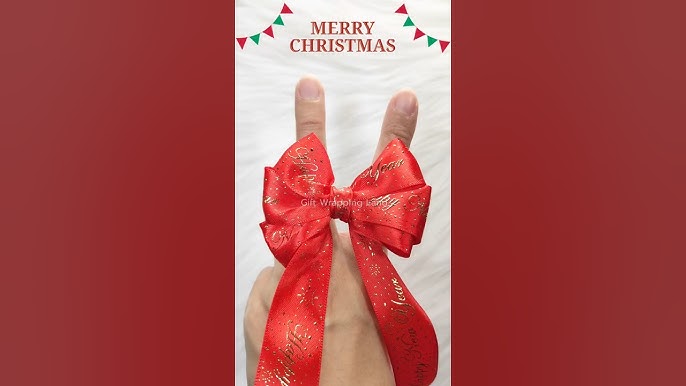
Are you ready to add a personal touch to your holiday gifts this year? Making Christmas bows for your presents is easier than you think—and it can transform any gift into something truly special.
Imagine the joy on your loved ones’ faces when they see a beautiful, handmade bow on their gift. In this guide, you’ll discover simple steps to create stunning Christmas bows that will make your gifts stand out under the tree.
Keep reading, and by the end, you’ll have the skills to impress everyone with your festive wrapping!

Credit: www.southerncrushathome.com
Choosing Materials
Choosing the right materials sets the foundation for creating beautiful Christmas bows that truly stand out. The texture, color, and flexibility of your materials will affect how easy the bow is to make and how elegant it looks on your gift. Think about the style you want—classic, rustic, or modern—and pick materials that match that vibe.
Ribbon Types
Not all ribbons are created equal. Satin ribbons are smooth and shiny, giving your bow a polished look. Grosgrain ribbons have a ribbed texture, adding a bit of rustic charm and holding their shape well.
Wired ribbons are a favorite because the thin wire along the edges lets you shape and fluff your bow easily. If you want something eco-friendly, consider fabric scraps like burlap or cotton strips—they add a cozy, handmade feel. Ask yourself: do you want your bow to be soft and flowing or structured and bold?
Additional Supplies
Besides ribbon, having the right extras makes a huge difference. Thin floral wire or twist ties help secure your bow tightly without damaging the ribbon. Scissors with sharp blades ensure clean cuts that prevent fraying.
Double-sided tape or hot glue can keep your bow attached firmly to the gift. If you want to add sparkle, small bells, pine sprigs, or glittery picks can transform a simple bow into a festive masterpiece. What small detail could make your bow uniquely yours?
Preparing The Ribbon
Preparing the ribbon is a key part of making Christmas bows. It sets the stage for a neat and beautiful bow. Proper ribbon preparation helps the bow hold its shape and look polished on any gift. Focus on the ribbon’s length and edge finish for the best results.
Cutting The Ribbon
Choose the right ribbon length for your bow size. Cut it cleanly with sharp scissors to avoid frayed ends. Use a flat surface to measure and cut the ribbon straight. Cutting a little extra length allows for easier handling and shaping of the bow.
Sealing The Edges
Sealing prevents the ribbon ends from fraying and looking messy. Use a lighter or candle flame to lightly melt synthetic ribbon edges. Hold the ribbon carefully near the flame, but do not burn it. For fabric ribbons, use clear nail polish or fray check glue on the ends. Let it dry fully before using the ribbon in your bow.
Creating Basic Loops
Creating basic loops is the foundation of making beautiful Christmas bows that catch the eye. These loops give the bow its shape and fullness, making your gift look professionally wrapped. Once you master the art of forming loops, you can experiment with adding more to make your bows stand out.
Forming The First Loop
Start by cutting a length of ribbon that’s easy to handle—usually around 18 to 24 inches. Hold one end of the ribbon between your thumb and forefinger. Then, fold the ribbon back to create the first loop, making sure the loop is the size you want your bow’s center to be.
Pinch the base of the loop tightly to hold its shape. This step is crucial because a loose first loop will make the whole bow look messy. Do you notice how a firm pinch makes the loop look crisp and ready to add more?
Adding Multiple Loops
Once the first loop is secure, add more loops on each side to build fullness. Take the ribbon and fold it back again, creating a loop opposite the first. Keep the loops roughly the same size to maintain balance.
Hold the base firmly as you add loops, alternating sides to create a symmetrical bow. The more loops you add, the fuller and more eye-catching your bow will be. Have you tried varying the loop sizes to add a unique flair to your gifts?

Credit: www.tiktok.com
Securing The Bow
Securing your Christmas bow is a crucial step to ensure it stays perfectly in place on your gift. A loose bow can quickly lose its charm and make your present look less polished. By focusing on simple yet effective techniques, you can keep your bow tight and beautiful, adding that extra touch of care to your wrapping.
Tying The Center
The easiest way to secure a bow is by tying the center tightly. Pinch the loops of your bow in the middle and wrap a piece of ribbon or string around it, pulling firmly to hold everything together.
This method works well with most ribbon types and keeps the shape crisp. Have you noticed how a tightly tied center instantly makes the bow look fuller and more professional?
Using Wire Or String
For a more secure hold, especially with larger or heavier bows, use thin wire or strong string. Wrap the wire or string around the bow’s center several times and twist or tie it tightly at the back of the bow.
Wire is particularly helpful because it holds the shape better and is less likely to slip. Keep some floral wire handy during holiday wrapping—it’s a small tool that can make a big difference in your gift presentation.
Fluffing The Bow
Fluffing the bow is where your gift’s presentation truly comes to life. It transforms a simple loop of ribbon into a voluminous, eye-catching decoration that makes your gift stand out. The trick lies in carefully shaping and adjusting the bow to give it that perfect fullness and charm.
Shaping The Loops
Start by gently pulling each loop away from the center. This opens up the loops and creates a rounded shape instead of flat loops pressed against each other. Use your fingers to pinch the base of each loop, then curve the ribbon slightly to add bounce and dimension.
Don’t be afraid to experiment with the size of each loop. Larger loops bring a soft, elegant look, while smaller loops add a crisp, detailed effect. Try mixing both for a custom style that fits your gift’s personality.
Adjusting For Fullness
Once the loops are shaped, focus on the overall volume of the bow. Fluff the layers by gently lifting and separating them—this prevents the bow from looking squished or flat. A good rule is to make sure the bow looks full from every angle.
- If the bow feels too tight, loosen the knot slightly and reshape the loops again.
- For extra fullness, add a second layer of loops underneath the first.
- Use your fingers to tease out any flat spots, giving the bow a natural, airy look.
Have you noticed how a little fluffing changes the entire feel of your gift? This small step makes your bow look professionally done and adds a personal touch that recipients will appreciate.
Adding Decorative Touches
Adding decorative touches transforms simple bows into stunning gift toppers. These details make gifts look special and thoughtful. Small enhancements bring charm and elegance to your creations.
Attaching Tails
Tails give bows a finished and graceful look. Cut ribbon ends in a diagonal or V-shape for a neat finish. Attach tails under the bow center with glue or wire. Make tails long enough to show but not too long to drag.
- Use matching or contrasting ribbon for style.
- Layer multiple tails for fullness.
- Trim edges neatly to prevent fraying.
Incorporating Embellishments
Embellishments add sparkle and interest to bows. Small ornaments, beads, or bells create festive appeal. Glue or tie embellishments carefully to keep the bow balanced.
- Choose decorations that fit your gift’s theme.
- Use lightweight items to avoid weighing down the bow.
- Mix textures, like fabric flowers or glittery accents.
Attaching Bow To Gifts
Attaching your handmade Christmas bow to a gift can be just as creative as making the bow itself. The right attachment method ensures your bow stays secure and adds that perfect finishing touch. Let’s look at practical ways to fasten your bow beautifully.
Using Tape Or Glue
Tape is a quick and easy way to attach bows, especially if you want a clean look without extra bulk. Use double-sided tape for a nearly invisible hold that keeps the bow flat against the gift.
If your bow is heavier or made from thicker ribbon, a hot glue gun can provide a stronger bond. Just apply a small dab of glue on the back of the bow and press it firmly onto the wrapping paper for a few seconds.
Be cautious with glue if your wrapping paper is thin—it can tear easily. Have some extra tape ready just in case. Have you tried mixing both tape and glue for added security? It works wonders on tricky packages.
Tying Directly To Packages
Tying your bow directly onto the gift adds a rustic charm and guarantees it won’t slip off. Wrap a length of ribbon around the package first, then knot it tightly before securing your bow on top.
This method works best with boxes or firm shapes, where you can pull the ribbon snugly without damaging the gift. If you want to make the bow stand out, try using contrasting ribbon colors or textures for the tie and the bow.
Have you ever noticed how a bow tied this way feels more personal? It’s like your gift is wrapped with an extra layer of care that tape or glue can’t match.
Tips For Different Bow Styles
Choosing the right bow style can change the entire look of your Christmas gift. Each style has its own charm and suits different types of wrapping and occasions. Understanding some key tips will help you craft bows that not only look stunning but also stay perfectly in place.
Classic Bows
Classic bows are timeless and easy to make. Use wired ribbon for better shape and durability. You can fluff the loops by gently pulling and spreading them apart to add volume.
Try cutting the ribbon ends at an angle or in a V shape to give a polished finish. If your ribbon is thin, layering two ribbons of different colors or textures before tying can add a unique touch.
Pom-pom Bows
Pom-pom bows are fun and eye-catching, perfect for a playful gift wrap. Use multiple loops of ribbon, and don’t worry if they aren’t perfectly even—it adds to the charm.
Secure the center tightly with floral wire or twist ties to keep the bow fluffy and secure. Experiment with mixing ribbons in various widths and patterns to create a vibrant pom-pom effect.
Layered Ribbon Bows
Layered ribbon bows bring elegance and complexity without much extra effort. Start with a wide base ribbon and add narrower ribbons on top, stacking them neatly.
Use different textures like satin, velvet, or sheer ribbons to create depth. Pinch the layers together in the center and secure with a twist tie or hot glue for a lasting hold.

Credit: hellocreativefamily.com
Frequently Asked Questions
How Do You Make A Simple Christmas Bow For Gifts?
To make a simple Christmas bow, cut ribbon into equal lengths. Loop and pinch the center. Secure with wire or string. Fluff loops to shape. Attach to gifts using tape or ribbon for a festive look.
What Materials Are Needed To Create Christmas Gift Bows?
You need ribbon, scissors, wire or string, and tape. Choose festive colors and textures for variety. Optional: embellishments like bells or greenery enhance the bow’s appearance. These basic materials help craft beautiful Christmas gift bows easily.
Can I Reuse Christmas Bows For Next Year’s Gifts?
Yes, you can reuse Christmas bows if stored carefully. Keep them in a box to avoid crushing. Reusing saves money and reduces waste. Handle gently to maintain shape and look for future gift wrapping.
How To Make Christmas Bows Without Wire Or Tape?
Use a knot or twist technique with ribbon loops. Secure tightly by tying the ribbon’s center. Use double-sided tape or glue dots if available. This method works well for quick, wire-free Christmas bows on gifts.
Conclusion
Making Christmas bows for gifts adds a special touch to your presents. It saves money and shows your care. You only need simple materials and a little practice. Each bow you create will look unique and festive. Enjoy the process and share your creativity with loved ones.
Handmade bows make gift-giving more personal and joyful. Try different styles to find what you like best. Celebrate the season with beautiful, homemade decorations on every gift.

Similar Posts