How to Make Exploding Gift Box: Creative DIY Guide
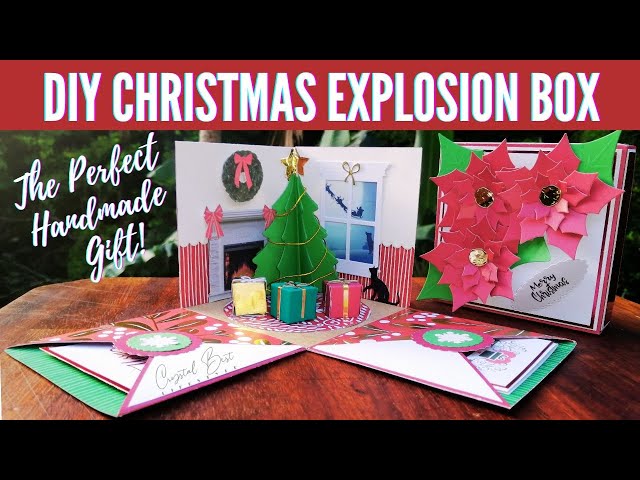
Imagine the look on your loved one’s face when they open a gift that literally explodes with surprises! You might think making an exploding gift box is complicated, but it’s easier than you expect.
If you want to create a unique, unforgettable present that shows how much you care, this step-by-step guide is exactly what you need. Keep reading, and you’ll learn how to craft your own stunning exploding gift box that will wow anyone who receives it.
Ready to make your gift truly special? Let’s get started!

Credit: www.youtube.com
Materials Needed
Gathering the right materials sets the stage for a successful exploding gift box project. You want to have everything ready before you start to avoid interruptions and keep your creativity flowing. The materials you choose will also affect the final look and feel of your gift box, so select items that match the occasion and the recipient’s style.
Basic Supplies
- Cardstock or thick paper:Choose sturdy paper for the box base and panels. It needs to hold its shape when folded and decorated.
- Scissors or craft knife:Sharp tools will help you cut clean edges and detailed shapes easily.
- Ruler and pencil:These help you measure and mark precise lines for folding and cutting.
- Glue or double-sided tape:Use strong adhesive to keep your box secure and prevent it from falling apart.
- Bone folder or scoring tool:This makes crisp folds for a professional finish.
- Decorative paper or wrapping paper:To cover and add color to the box’s outer surfaces.
- Photos or printed messages:Personal touches inside the box make it extra special.
Optional Decorative Items
- Ribbons and bows:These add a festive touch and make the gift box pop visually.
- Stickers or die cuts:Use themed stickers to match holidays, birthdays, or events.
- Glitter or sequins:A little sparkle can turn your gift box from simple to stunning.
- Miniature keepsakes:Tiny charms or trinkets can be hidden inside for a delightful surprise.
- Colored markers or pens:Add handwritten notes or doodles for a personal feel.
- LED tea lights:For a magical glow when the box opens.
Think about the personality of the person receiving your exploding gift box. What materials would delight them the most? Picking the right supplies can transform your project from ordinary to unforgettable.

Credit: www.abbikirstencollections.com
Choosing The Right Box
Choosing the right box is the foundation of a successful exploding gift box. It affects not only the look but also how well your surprise unfolds. Picking the perfect box size, shape, and material ensures your creation is sturdy, attractive, and just the right fit for your special items.
Size And Shape Considerations
Think about what you want to place inside your exploding box. Is it photos, small gifts, or notes? Your box needs to be big enough to hold everything without forcing items in.
Square boxes work best because they fold evenly and create clean, dramatic edges when opened. However, don’t shy away from experimenting with rectangles or hexagons if you want a unique effect.
- Measure the largest item first to determine the minimum size.
- Leave some extra room for decorations and layering inside the box.
- Consider how the box will look when closed—too large can lose the element of surprise.
Have you ever opened a gift only to find it too cramped or loosely packed? That’s often a sign the box size was off. Getting this right improves the whole experience.
Material Types
The material you choose impacts durability and appearance. Cardstock is a popular choice because it’s sturdy but easy to fold and decorate.
Other options include corrugated cardboard for a tougher build or even lightweight wood for a premium touch. Keep in mind how easy it will be to cut and glue the material.
| Material | Pros | Cons |
|---|---|---|
| Cardstock | Easy to fold, widely available, good for decorations | Less durable, can bend if too thin |
| Corrugated cardboard | Very sturdy, supports heavy items | Harder to fold, heavier |
| Lightweight wood | Premium look, very durable | Needs special tools, less flexible |
What feeling do you want your box to give? Soft and delicate or strong and lasting? The material sets the tone before anyone even opens it.
Preparing The Base
Preparing the base is the foundation of your exploding gift box. It determines how well your box will hold together and how smoothly it will open. Paying attention to this stage saves you from frustration later and ensures a clean, professional look.
Cutting And Folding Techniques
Precision matters when cutting the cardboard or cardstock. Use a sharp craft knife or scissors and a ruler to keep your lines straight. Uneven cuts make folding difficult and ruin the box’s appearance.
Folding requires a crisp crease to help the box pop open neatly. Score the fold lines lightly with a bone folder or the back of a butter knife before folding. This small step makes a huge difference in how clean and sharp your edges look.
Have you noticed how a poorly folded box looks sloppy? Take your time with each fold. A smooth crease also helps the box open without tearing or bending out of shape.
Reinforcing The Structure
Once cut and folded, the base needs strength to hold all the surprise layers inside. Add extra strips of cardstock or double up the base layer to prevent bending. Thin cardboard can get flimsy quickly, especially if your box is big.
Use strong glue or double-sided tape to secure the corners and edges firmly. Weak joints can cause the box to collapse or not open properly. Testing the base by gently pressing on it before moving forward can save you from major repairs later.
Think about how your box will be handled. Will it be opened multiple times? Reinforcing the base ensures it stands up to excitement and curiosity without falling apart.
Creating Layers
Creating layers is where your exploding gift box really starts to take shape and wow your recipient. Layers add depth and surprise, making each reveal more exciting than the last. Focusing on how to build and attach these layers securely will ensure your box functions smoothly and looks fantastic.
Building Multiple Tiers
Think of each layer as a smaller box sitting inside the bigger one. Cut your cardboard or craft paper to gradually smaller sizes, so each tier fits comfortably within the previous one. This gives your explosion effect a beautiful cascading look as the layers unfold.
Use colorful paper or patterned designs on each tier to add visual interest. I once used different shades of blue and green for a nature-themed box, and the effect was stunning. Have you considered how the color contrast between layers can make your gift pop?
Don’t forget to leave enough space between layers for any decorations or small gifts you want to include. This space is what makes each layer feel like a special discovery. Planning your sizes ahead helps avoid squishing your surprises.
Attaching Layers Securely
Securing layers so they don’t shift or fall apart is crucial for a neat explosion. Use double-sided tape or strong glue along the edges where each layer meets the next. This keeps everything tight but still allows the box to open smoothly.
Adding small corner reinforcements with washi tape or paper strips can give extra strength without bulk. When I skipped this step once, the layers didn’t hold well, and the box looked messy. How important is durability to you for this gift?
Test your layers by gently opening and closing the box before adding fragile items. This simple check saves disappointment later. Remember, a secure layer means your gift stays intact until the big reveal.
Decorating The Box
Decorating the exploding gift box makes it special and exciting. The outside sets the mood before the box opens. Simple touches can turn a plain box into a charming surprise. Creativity shines here. Focus on colors, textures, and shapes that reflect the occasion.
Adding Paper Crafts
Paper crafts add a personal and artistic touch. Use patterned paper, cutouts, or origami shapes. Stick flower shapes or stars on the box lid and sides. Paper flowers or butterflies create a delicate look. Layer different colors or textures of paper for depth. Use glue dots or double-sided tape for neat edges. Paper crafts are lightweight and easy to customize.
Using Ribbons And Embellishments
Ribbons add color and softness to the box. Wrap a satin or grosgrain ribbon around the box. Tie a neat bow on top or the side. Embellishments like buttons, beads, or small charms add interest. Attach these with glue or thread. Use glitter or stickers for extra sparkle. Keep decorations balanced to avoid a cluttered look. Ribbons and embellishments make the box feel festive and joyful.
Adding Surprises Inside
Adding surprises inside an exploding gift box makes it truly special. These hidden treasures delight the receiver and create lasting memories. Thoughtful items tucked inside bring excitement and joy. Personal touches make the gift box unforgettable. Choose surprises that fit the occasion and the person’s taste. Keep the surprises small enough to fit comfortably inside.
Photo Frames And Messages
Include small photo frames with favorite pictures. Photos capture happy moments and add a personal touch. Use lightweight frames to keep the box easy to open. Add handwritten messages on colorful paper. Short notes express feelings and warm wishes. Fold or roll the messages for a fun reveal. Combine photos and messages for a heartfelt surprise.
Small Gifts And Trinkets
Choose small gifts that bring joy and meaning. Popular options include jewelry, keychains, or charms. Tiny toys or collectibles can add a playful vibe. Include items that suit the receiver’s hobbies or interests. Wrap each gift in tissue paper or place in mini bags. This adds an element of discovery and excitement. Balance the number of surprises for a neat presentation.
Assembling The Exploding Box
Assembling the exploding gift box is where your creativity really takes shape. This step transforms flat pieces of paper into a delightful surprise that folds open to reveal hidden compartments and decorations. The process requires attention to detail and a bit of patience, but the result is always worth it.
Final Folding Tips
Make sure your folds are crisp and clean. Use a bone folder or the edge of a ruler to press down each fold firmly. This helps the box open smoothly without sticking or tearing.
Be consistent with your folding directions to keep the layers neat. If some edges don’t line up perfectly, gently adjust them before securing the box. Your hands will get a feel for how tight or loose each fold should be, which improves the overall look.
Securing The Lid
The lid must fit snugly to keep the surprise inside until the right moment. Test the lid by placing it on top and adjusting the flaps if necessary. It should hold without forcing, so the box opens easily when pulled.
Use double-sided tape or glue dots on the lid’s inner edges to keep it in place. Avoid too much adhesive, or the lid might stick permanently. Remember, the excitement comes from the box exploding open—make sure your lid doesn’t spoil the reveal!
Customizing For Occasions
Customizing an exploding gift box makes it extra special. Personal touches show thought and care. Tailoring the box to the occasion creates memorable moments. Colors, decorations, and small gifts inside can all reflect the theme. This section explores ideas for popular events and holidays.
Birthday Themes
Choose bright colors to match the birthday person’s favorite shades. Use patterned paper with balloons, cakes, or candles. Add small photos or notes inside for a personal touch. Include mini gifts like candy, jewelry, or tiny toys. Write happy birthday messages on each side of the box. Use stickers or cutouts related to hobbies or interests. For kids, add cartoon characters or superheroes. For adults, use elegant designs or simple, classy decorations.
Holiday Variations
Change colors and decorations to fit the holiday spirit. Use red and green for Christmas, with small ornaments or candy canes inside. For Halloween, choose orange and black, with spooky stickers or tiny treats. Valentine’s Day boxes can be red or pink, filled with love notes and chocolates. Easter themes work well with pastel colors and small eggs or bunny figures. Add festive ribbons and themed tags to complete the look. These small changes create big holiday cheer.
Troubleshooting Common Issues
Creating an exploding gift box can be fun, but some issues might slow you down. Knowing how to fix these common problems helps your project look great and work well. This section covers simple fixes for folding and stability troubles.
Box Not Folding Properly
Folding problems often happen because the paper is too thick or the creases are weak. Use a bone folder or the edge of a ruler to make sharp folds. Score the fold lines lightly before folding to guide the paper.
Check that all folds match the template. If a fold looks uneven, unfold and try again carefully. Avoid forcing the paper, which can cause tears or wrinkles.
Layer Stability Problems
Layers can fall apart if glue is too little or applied unevenly. Use enough glue on all joining edges. Press each layer firmly until the glue sets.
Stack layers evenly to keep the box balanced. Use clips or small weights to hold layers while drying. This stops shifting and keeps the box neat.
Creative Variations
Creative variations of exploding gift boxes make each surprise unique and memorable. Small changes in size, design, and added features can transform a simple box into a delightful experience. Experiment with different ideas to match the occasion and the person receiving the gift.
Mini Exploding Boxes
Mini exploding boxes are perfect for small gifts or notes. They use less paper and are easier to carry. These tiny boxes can hold small charms, jewelry, or messages inside. Their compact size makes them ideal for party favors or quick surprises.
Creating mini versions follows the same folding steps but uses smaller squares. Choose bright colors or themed patterns to make them eye-catching. Layer the mini boxes with different colors for an exciting reveal.
Interactive Elements
Adding interactive elements turns the exploding box into a playful gift. Include pull tabs, pop-up shapes, or spinning wheels inside. These features engage the recipient and make the unboxing fun.
Use stickers, ribbons, or small envelopes to hold secret messages. Attach tiny photos or notes that can be lifted or flipped. These interactive touches add a personal feel and keep the surprise going longer.

Credit: m.youtube.com
Frequently Asked Questions
What Materials Are Needed For An Exploding Gift Box?
You need cardstock, glue, scissors, decorative paper, and embellishments. Optional items include ribbon, stickers, and photos to personalize your box.
How Do You Assemble An Exploding Gift Box?
Cut and score cardstock into panels, then fold and glue edges. Layer decorations inside and attach surprises to each panel carefully.
Can I Customize The Exploding Gift Box Design?
Yes, you can customize colors, patterns, and decorations. Personalize it with photos, messages, or themed embellishments to suit any occasion.
How Long Does It Take To Make An Exploding Gift Box?
Typically, it takes 30 minutes to 1 hour depending on complexity. More detailed designs or added decorations may require extra time.
Conclusion
Making an exploding gift box is fun and simple. You only need a few materials and a little time. Each box you create can surprise and delight the person who opens it. Personalize it with your favorite colors and small gifts inside.
This craft adds a special touch to any celebration. Try it for birthdays, holidays, or just to show you care. Enjoy the process and the smiles it brings. Give it a go, and watch your gift come alive!

Similar Posts