How to Make a Gift Box for Christmas: DIY Guide
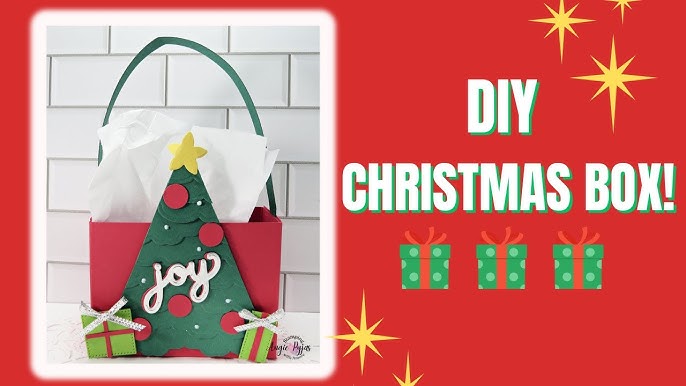
Are you ready to add a personal touch to your Christmas gifts this year? Making your own gift box can turn a simple present into something truly special.
Imagine the smile on your loved one’s face when they see a beautifully crafted box made just for them. In this guide, you’ll discover easy steps to create your own festive gift box, even if you’ve never tried it before.
Keep reading, and you’ll learn how to impress with your creativity while saving money and making your holiday gifts unforgettable.

Credit: www.youtube.com
Materials Needed
Gathering the right materials is key to making a beautiful Christmas gift box. The right supplies ensure your box looks neat and festive. Prepare everything before you start. This saves time and avoids frustration. Materials include paper, tools, and decorative items. Each plays an important role in the final look.
Choosing The Right Paper
Select paper that is sturdy but easy to fold. Cardstock or craft paper works well. Wrapping paper can add colorful designs. Plain paper is good for a simple look. Pick festive colors like red, green, gold, or silver. Check the size to fit your gift. Avoid thin paper that tears easily.
Essential Tools
- Scissors for clean cuts
- Ruler for precise measurements
- Glue stick or double-sided tape for assembly
- Pencil for marking folds
- Bone folder or a blunt edge to create sharp creases
- Cutting mat to protect surfaces
Decorative Elements
Decorations make your gift box unique and festive. Use ribbons and bows for a classic touch. Stickers and washi tape add patterns and color. Small ornaments or bells bring holiday charm. Glitter or metallic markers highlight edges. Choose decorations that match your paper and theme. Keep it simple to avoid clutter.

Credit: www.stampingwithamore.com
Preparing The Box
Preparing the box is a crucial part of making a Christmas gift box that looks neat and holds your gift securely. Taking your time with this step pays off with a polished final product that feels special. Let’s dive into the details that will help you shape a sturdy and attractive box.
Measuring And Cutting
Start by deciding the size of your gift box based on the item you want to put inside. Use a ruler and pencil to mark the dimensions clearly on your chosen paper or cardboard. Precision matters here—cut along the lines carefully with sharp scissors or a craft knife to avoid ragged edges.
Have you noticed how a slightly uneven cut can make the whole box look off? I once rushed this part and ended up with a lopsided box that was hard to fold. Take a breath and cut slowly; your hands will thank you later.
Folding Techniques
Once your pieces are cut, the next challenge is folding. Crease the edges sharply by running a bone folder, the back of a butter knife, or even a fingernail along the fold lines. This helps the box keep its shape and makes assembly easier.
Try folding along the scored lines before applying any glue or tape to check if everything fits well. If the folds don’t align perfectly, adjust the creases slightly—you want crisp, clean corners for a professional look.
Assembling The Base
With your pieces folded, start assembling the box base by bringing the sides together. Use double-sided tape or craft glue on the tabs to secure the edges firmly. Press and hold for a few seconds to make sure the glue sets properly.
Remember, the strength of the base affects how well the box supports the gift inside. I once used weak tape and the box came apart before the gift was even unwrapped. Investing in quality adhesive ensures your box stays intact through all the holiday excitement.
Creating The Lid
Creating the lid is a crucial part of making your Christmas gift box. It not only protects your gift but also adds to the overall presentation. Getting the lid just right can transform a simple box into a memorable gift experience.
Sizing The Lid
The lid should fit snugly over the base without being too tight or loose. Measure the width and length of your box, then add about 1/8 inch (3 mm) to each side for clearance. For the height, make it about 1 to 1.5 inches taller than the box walls so it can cover fully without slipping off.
Consider the thickness of your material too. Thicker cardboard or paper means you might need to add a bit more allowance. Have you ever struggled to put a lid back on because it was too tight? Avoid that frustration by double-checking your measurements before cutting.
Folding And Securing
Once the lid dimensions are set, score the edges to create clean folds. Use a ruler and a blunt edge, like the back of a butter knife, to make crisp fold lines. This helps the lid keep its shape and look professional.
When folding, make sure the corners are sharp and neat. Overlapping flaps should be glued or taped securely on the inside to keep the lid sturdy. If you want, you can add decorative tape on the outside for an extra festive touch.
Adding Reinforcements
Reinforcements prevent the lid from bending or warping, especially if the gift is heavy or the box will be reused. You can add a thin layer of cardboard inside the lid or apply strips along the edges. This simple step makes a big difference in durability.
Think about your lid’s purpose—will it be opened many times? Adding reinforcements is worth the effort for a lid that lasts beyond just one use. What materials do you have at home that could make your lid stronger without adding bulk?
Decorating Ideas
Decorating your Christmas gift box is where you can truly express your creativity and make your present stand out. Simple additions can transform a plain box into something special and memorable. What small touches will you add to make your gift box uniquely yours?
Ribbon And Bows
Ribbons and bows instantly add charm and elegance to any gift box. Choose colors that match your holiday theme, like classic red, green, or gold. You can wrap a wide satin ribbon around the box or use thin twine for a rustic look.
Try layering different ribbons to add texture and depth. A shiny bow on top creates a focal point that draws attention. Have you ever tried tying a bow with loops and tails that look professionally done? It’s easier than you think and makes a big impact.
Personalized Tags
Adding a personalized tag makes your gift feel thoughtful and unique. Use cardstock or recycled paper to create tags in different shapes—stars, trees, or simple rectangles work well. Handwrite the recipient’s name or a short message to add a personal touch.
You can also add small decorations to the tag, like tiny bells, glitter, or a sprig of pine. These details show you put extra effort into your gift. What message would make your loved one smile every time they see the tag?
Using Stamps And Stickers
Stamps and stickers are quick ways to add festive designs without much effort. Pick holiday-themed stamps like snowflakes, reindeer, or holly, and use colored ink pads to brighten your box. Stickers can add a playful or elegant vibe depending on your choice.
Mix and match stamps and stickers for a layered look. You can stamp patterns all over the box or place stickers strategically for balance. Have you considered making your own stamps with potatoes or foam sheets? It’s a fun activity that adds a personal flair.
Tips For Unique Boxes
Creating a unique gift box adds a special touch to Christmas presents. It shows care and thoughtfulness. Simple changes can turn a plain box into a memorable gift container. Explore different ideas to make your box stand out.
Incorporating Themes
Choose a theme that fits the gift or the recipient’s personality. Use colors, patterns, and decorations that match the theme. For example, a winter theme might include snowflakes and silver ribbons. A vintage theme could use old maps or lace. Themes make the box more personal and exciting to open.
Eco-friendly Options
Use materials that are good for the environment. Recycled paper, fabric scraps, or newspaper can wrap the box. Natural twine or dried flowers work as decorations. Avoid plastic ribbons or glitter. Eco-friendly boxes feel thoughtful and help reduce waste.
Adding Texture And Layers
Mix different materials to create a rich look. Combine smooth paper with rough burlap or soft felt. Add layers by wrapping tissue paper inside the box or using multiple ribbons outside. Texture makes the box interesting to touch and see. It creates a sense of depth and care.

Credit: theshabbytree.com
Storing And Shipping
Storing and shipping your Christmas gift box safely ensures the surprise stays perfect. Careful handling prevents damage and keeps your gift fresh. Thoughtful packaging adds to the joy of receiving.
Protecting The Contents
Use soft materials like tissue paper or bubble wrap inside the box. Wrap fragile items individually to avoid scratches or breaks. Fill empty spaces with packing peanuts or crumpled paper. This stops items from moving during transport. Choose a sturdy box that fits the contents well. Avoid overstuffing the box, which can cause pressure damage.
Packaging For Delivery
Seal the box tightly with strong tape. Reinforce corners and edges for extra strength. Label the box clearly with the delivery address and your return address. Include “Fragile” stickers if the contents are breakable. Select a reliable courier for safe delivery. Track the shipment to ensure it arrives on time.
Frequently Asked Questions
How Do I Start Making A Christmas Gift Box?
Begin by choosing sturdy cardboard or craft paper. Cut pieces for the base and lid. Assemble with glue or tape. Decorate with festive wrapping paper or ribbons for a personalized touch.
What Materials Are Best For Christmas Gift Boxes?
Use thick cardstock, cardboard, or recycled paper. These materials provide durability and are easy to decorate. Add embellishments like ribbons, stickers, or paint for a festive look.
How Can I Decorate A Homemade Gift Box?
Apply wrapping paper, ribbons, or bows. Use markers or stamps to add designs. Attach small ornaments or tags to enhance the holiday theme and make your gift box stand out.
What Size Should A Christmas Gift Box Be?
Choose a size that fits your gift snugly but leaves space for padding. Measure your gift first. Standard sizes vary, but custom sizing ensures protection and a neat appearance.
Conclusion
Making a Christmas gift box is simple and fun. You can use paper, ribbon, and decorations you like. Personal touches make gifts feel special and warm. This craft saves money and adds joy to giving. Try different shapes and colors for variety.
Enjoy the process and share your creativity. Your loved ones will appreciate the effort and care. Start today and make your Christmas gifts stand out. A handmade box shows love in every fold. Give a gift that truly comes from the heart.

Similar Posts