How to Make a Little Gift Box: Easy DIY Ideas for Perfect Presents
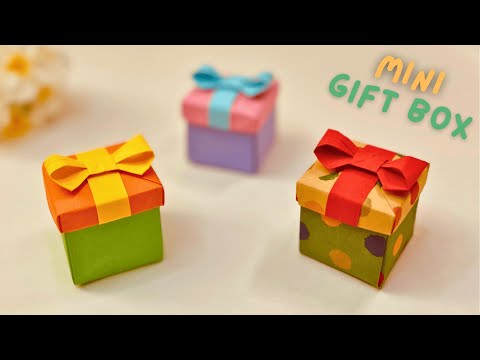
Looking for a simple way to make your gifts feel extra special? Learning how to make a little gift box is easier than you think—and it adds a personal touch that everyone loves.
Imagine giving your friend or loved one a beautifully wrapped surprise that shows you truly care. In this guide, you’ll discover easy steps to create your own gift box using materials you probably already have. By the end, you’ll have a charming little box ready to impress, making your gift unforgettable.
Ready to start? Let’s dive in!

Credit: www.youtube.com
Materials Needed
Gathering the right materials is the first step to creating a little gift box that looks neat and feels sturdy. The quality and type of materials you choose will directly affect the final outcome. Have you ever started a craft project only to realize you didn’t have the proper tools? That’s frustrating and can ruin your motivation.
Let’s break down exactly what you need to have on hand before you begin. This way, you’ll avoid last-minute runs to the store and stay focused on crafting your perfect gift box.
Paper Or Cardstock
Choose a paper that is thick enough to hold its shape but easy to fold. Cardstock is ideal because it balances sturdiness and flexibility well.
Color and pattern matter too—do you want something plain for a minimalist look, or patterned for added flair? I once used wrapping paper, and while it looked great, it was too flimsy to hold heavier items.
Cutting Tools
- Scissors:A sharp pair makes clean cuts without tearing.
- Craft Knife:Perfect for precise edges, especially for intricate designs.
Make sure your blades are sharp. Dull scissors or knives can cause jagged edges and frustration.
Adhesive Options
- Glue Stick:Good for light paper, dries quickly.
- Double-sided Tape:Provides a clean finish without drying time.
- Liquid Glue:Offers strong hold but requires drying time.
Think about the box’s purpose when choosing adhesive. Is it going to be opened multiple times? Tape might be better for easy access.
Ruler And Scoring Tool
A ruler helps you measure and mark straight lines accurately. Scoring tools create clean fold lines, making your box look professional.
I learned that folding without scoring often results in uneven edges, which take away from the box’s charm. Do you have a bone folder? It’s a handy tool for making crisp folds.
- Ribbon or Twine:Adds a personal touch and secures the box.
- Stickers or Stamps:Great for customizing your design.
- Markers or Pens:Perfect for writing a message or drawing patterns.
Consider how you want your gift box to feel—simple and elegant or fun and colorful? Your decorations will set the tone.

Credit: www.youtube.com
Choosing The Right Paper
Choosing the right paper sets the foundation for your gift box. Paper affects the box’s strength and appearance. Picking the best paper makes crafting easier and the box more beautiful.
Consider the paper’s weight and texture. These details help the box hold its shape and look nice. The right paper also feels good to touch and is simple to fold.
Types Of Paper
Several paper types suit making gift boxes. Cardstock is thick and sturdy. It holds shape well and is easy to cut. Construction paper is lighter but colorful. It works for small or simple boxes.
Wrapping paper adds patterns and colors but can be thin. Scrapbook paper offers various designs and moderate thickness. Kraft paper gives a natural, rustic look. Choose based on the box’s size and use.
Color And Pattern Selection
Colors and patterns set the mood of your gift box. Solid colors give a clean and classic feel. Bright colors bring energy and fun. Soft colors create a calm, gentle look.
Patterns add interest and style. Stripes, polka dots, or floral designs work well. Match colors and patterns to the occasion. Keep balance to avoid making the box look too busy.
Basic Folding Techniques
Mastering basic folding techniques is key to creating a neat and sturdy little gift box. These skills help you shape the paper precisely, making your box both functional and charming. Once you get the hang of these folds, you’ll find the process quicker and more enjoyable.
Origami Essentials
Start with a square piece of paper—this is the foundation of most folding projects. Make sure the paper is crisp but not too thick, so the folds stay sharp and the box holds its shape well.
Keep these simple tools nearby:
- A bone folder or the edge of a ruler to crease folds sharply
- A flat surface to work on, like a table or desk
- Optional: a pencil to mark fold lines lightly
Have you ever struggled with folds that don’t line up? Taking time to align edges perfectly before creasing makes a huge difference. It’s not about speed; it’s about precision.
Step-by-step Folding Guide
Begin by folding the paper in half horizontally, then unfold it to reveal a center crease. Next, fold it in half vertically and unfold again—these creases will guide your next steps.
Fold each corner toward the center point where the creases intersect. This forms a smaller square with triangular flaps. Press down firmly on each fold to secure the shape.
Fold the new edges toward the center line, then tuck in the flaps to lock everything together. If your paper resists folding or pops open, try reinforcing creases with a bone folder. Do you notice how each fold adds structure and stability?
Decorative Elements
Decorative elements transform a simple gift box into something special. They add charm and personality. These touches make the box stand out. Small details can show care and effort. Choose decorations that match the gift’s theme or the receiver’s taste. Simple additions make a big impact on the overall look.
Adding Ribbons And Bows
Ribbons and bows bring elegance and color to a gift box. Select ribbons in colors that complement the box. Satin, grosgrain, or velvet ribbons each offer a different texture. Wrap the ribbon around the box neatly. Tie a bow on top or to the side for a stylish finish.
Use double-sided tape to keep ribbons in place. Curl ribbon ends with scissors for a playful touch. Bows can be pre-made or handmade using loops of ribbon. Experiment with sizes to find what looks best. Ribbons add volume and soften sharp box edges.
Using Stickers And Stamps
Stickers and stamps add personality and fun to your gift box. Choose stickers that match the occasion or theme. Flowers, stars, or hearts work well for many events. Place stickers carefully to avoid cluttering the design.
Rubber stamps create custom patterns or messages. Use ink pads in various colors for variety. Stamp on plain or colored paper, then glue it to the box. This technique adds a handmade feel. Small stamped images can decorate corners or edges.
Personalized Touches
Adding personalized touches to your little gift box transforms it from simple packaging into a meaningful keepsake. These details show thoughtfulness and care, making your gift truly stand out. Personalization invites you to connect more deeply with the recipient, creating an experience beyond the contents inside.
Custom Messages
Writing a custom message adds warmth and personality to your gift box. You can handwrite a short note on a small card or print a personalized tag with the recipient’s name and a heartfelt greeting.
Think about the occasion and your relationship with the person. Would a funny quote, a loving phrase, or a simple “thank you” resonate best? Even a single line can leave a lasting impression.
Try using colorful pens, calligraphy, or stickers to make your message visually appealing. Have you ever received a gift where the note made you smile before you even opened the box? That’s the power of a custom message.
Unique Embellishments
Embellishments bring charm and creativity to your gift box. Consider adding ribbons, dried flowers, or small charms that match the recipient’s style or interests.
- Use washi tape with fun patterns to seal the box or decorate the edges.
- Attach miniature ornaments or tiny bells for a festive touch.
- Include fabric scraps or lace for a soft, textured feel.
These small details show extra effort and can make your gift box feel like a work of art. What unique item do you have on hand that could make your box one of a kind? Don’t hesitate to get creative and experiment with different textures and colors.
Creative Box Designs
Creative box designs transform a simple gift box into a memorable experience. They allow you to tailor each box to the personality of the recipient or the occasion. Adding unique touches can make your gift stand out and show extra thoughtfulness.
Themed Gift Boxes
Design your box around a specific theme that matches the recipient’s interests or hobbies. For example, a book lover might appreciate a box decorated with literary quotes and small bookmarks inside.
You can also create a spa-themed box with mini lotions, scented candles, and soft towels. Think about colors, patterns, and small decorations that reinforce the theme. This makes the unwrapping feel like opening a carefully planned surprise.
Seasonal Variations
Adjust your box design to fit the season for a fresh, timely feel. During winter, try adding snowflake cutouts or warm color palettes like reds and golds.
In spring, bright floral patterns and pastel ribbons can add a cheerful touch. Seasonal designs connect your gift to the current moment, making it feel more personal and thoughtful.
Tips For Perfect Presentation
Presenting a little gift box beautifully makes the gift feel special. A well-arranged box excites the receiver and shows care. Simple steps can make your gift look neat and charming. Focus on how you place items and add final details.
Arranging Contents
Start by choosing soft filler material like tissue paper or shredded paper. It cushions the items and keeps them in place. Place the largest item at the bottom or center for balance. Surround it with smaller gifts to fill empty spaces.
- Use color-coordinated paper to match the gift theme.
- Keep fragile items away from edges to avoid damage.
- Group similar items together for a tidy look.
Try to avoid overcrowding. Leave some space for the box to close easily.
Final Touches
Add a ribbon or bow on the outside for a polished look. Choose a ribbon color that complements the box design. A small tag with a personal message adds warmth.
- Secure the ribbon tightly to keep it neat.
- Use stickers or stamps for extra decoration.
- Check the box edges to ensure they are clean and crisp.
Lightly press the box closed to check everything fits well. The perfect presentation makes your gift memorable and delightful.

Credit: www.youtube.com
Frequently Asked Questions
What Materials Are Needed To Make A Little Gift Box?
To make a little gift box, you need cardstock paper, scissors, glue, and a ruler. Optional items include decorative paper, ribbons, and stickers for embellishment.
How Do I Fold A Little Gift Box Perfectly?
Fold the cardstock along scored lines carefully to ensure sharp edges. Use a bone folder or ruler to make crisp folds for a neat finish.
Can I Customize The Size Of The Gift Box?
Yes, you can customize the size by adjusting the dimensions of the cardstock. Measure and cut according to your desired box size before folding.
What Types Of Decorations Suit A Little Gift Box?
Decorate with ribbons, stickers, washi tape, or hand-drawn designs. Choose colors and patterns that match the occasion for a personalized touch.
Conclusion
Creating a little gift box is simple and fun. You only need a few materials and some patience. This small project adds a personal touch to your gifts. It shows care and effort, making your present special. Try different colors and patterns to make each box unique.
Practice helps you improve your folding and decorating skills. Share your handmade boxes with friends and family. They will appreciate the thought behind your gift. Keep crafting and enjoy the joy of giving!

Similar Posts