Fake Amazonite vs Real Microcline: The White Streak Test

You’ve probably seen those vibrant blue-green beads and wondered if they’re the real deal. Distinguishing fake amazonite from genuine microcline feldspar is tricky because dyed howlite looks incredibly convincing to the naked eye. That’s where the white streak test comes in, offering a simple yet powerful diagnostic tool for collectors and jewelers alike.
Real amazonite leaves a white or pale gray powder when rubbed on an unglazed surface. Fakes often bleed color or leave nothing at all. As of 2026, this method remains one of the most accessible ways to verify authenticity without expensive lab equipment.
Let’s break down exactly what you need to look for.
Quick Answer
The white streak test separates real amazonite from dyed fakes effectively. Genuine microcline feldspar produces a white or light gray powder. Dyed howlite or chalcedony often releases blue or green dye residue.
Glass imitations typically leave no streak or scratch the plate. Always use an unglazed porcelain tile for consistent results. Check inconspicuous areas to avoid damaging visible surfaces.
This non-destructive method provides immediate visual confirmation of material integrity. It works best when combined with hardness checks for total certainty.
Image source: Web (Bing) / vemaps.com (Web image (fair-use with source credit))
Why Your Eyes Alone Can’t Spot Fake Amazonite
Visual inspection fails because modern dyes penetrate deep into porous stones. Howlite, a soft white mineral, absorbs color uniformly, mimicking natural banding. You might see slight variations, but these are often engineered by tumblers.
The human eye struggles to detect microscopic dye concentrations that don’t sit on the surface.
Natural amazonite gets its color from trace amounts of lead and water within its crystal lattice. This creates distinct, irregular veining patterns. Fakes tend to have too-perfect symmetry or color pooling in cracks.
However, high-quality counterfeits replicate these flaws intentionally. Relying solely on appearance leads to costly mistakes, especially for bulk buyers.
We need objective physical tests to bypass optical illusions. The streak test removes guesswork by analyzing the powdered form of the stone. Color in solid form can be deceptive.
Powder reveals the true chemical composition more reliably. This distinction is critical for accurate valuation.
The Streak Test: What You’re Actually Looking For
The streak test involves rubbing a mineral against an unglazed ceramic surface. This abrasive action grinds off tiny particles, creating a powder line. The color of this powder is the "streak." It is often different from the mineral’s external color.
For microcline feldspar, the expected streak is white to very light gray. If you see blue, green, or teal residue, the stone is likely dyed. The dye sits in pores and releases upon friction.
This is a definitive sign of treatment rather than natural formation.
Glass imitations behave differently. They are harder than the porcelain plate. Instead of leaving a powder, glass will scratch the tile.
You’ll hear a squeaking sound and see clear gouges. No colored dust appears. This absence of streak helps rule out crystalline fakes quickly.
Interpreting White vs. Colored Residue
A pure white streak confirms the base material is likely feldspar or quartz. Any tint indicates foreign substances. Pale yellow or brown streaks suggest iron staining, which is natural but affects value.
Bright blue or green means artificial enhancement.
Be careful with lighting. Natural daylight provides the best visibility for subtle hues. Artificial lights can cast shadows or alter perceived colors.
Use a magnifying loupe if available. Inspect the edge of the streak line closely. Sometimes only the center shows color while edges remain white.
| Stone Type | Expected Streak Color | Visual Indicator |
|---|---|---|
| Real Amazonite | White / Light Gray | Fine, powdery deposit |
| Dyed Howlite | Blue / Green | Wet-looking or smeared dye |
| Dyed Chalcedony | Blue / Green | Often darker due to density |
| Glass | None | Scratches the plate instead |
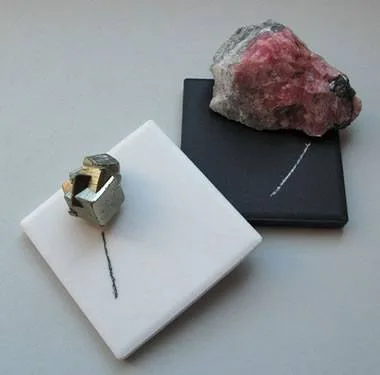
Image source: Bing (Web (fair-use with source credit))
When the Streak Lies: Dye Penetration and Surface Treatments
Some vendors seal dyed stones with resin or wax. This coating prevents dye release during a quick rub. The streak may appear falsely white.
To counter this, scrape a small amount of surface material first. Or apply gentle heat to soften the sealant before testing.
Deep-dyed howlite can sometimes resist immediate color transfer. Rubbing for ten seconds might yield little result. Extend the test duration.
Apply firm, consistent pressure. Watch for gradual color emergence. If the streak stays pristine white after vigorous rubbing, it’s likely untreated.
But always cross-reference with other properties.
Resin impregnation is common in lower-grade amazonite. It fills fractures to improve durability. This doesn’t change the streak color significantly.
However, it makes the stone heavier. Combine the streak test with specific gravity measurements for robust verification. Never rely on a single data point for high-value assessments.
Beyond the Plate: Hardness and Specific Gravity Checks
The streak test identifies dye but not necessarily the base mineral. Howlite and amazonite both streak white if undyed. You must check hardness to distinguish them.
Microcline feldspar rates 6 to 6.5 on the Mohs scale. Howlite is much softer, around 3.5.
Use a steel nail or knife blade (hardness ~5.5). Press firmly against an inconspicuous spot. Real amazonite will not scratch.
Howlite will mark easily. This simple scratch test eliminates soft stone fakes instantly. It complements the streak test perfectly.
Specific gravity adds another layer of confidence. Amazonite has a density of approximately 2.54 to 2.57 g/cm³. Howlite varies widely depending on porosity but is generally lighter.
Weigh the stone in air, then submerged in water. Calculate the ratio. Deviations suggest composite materials or heavy fillers.
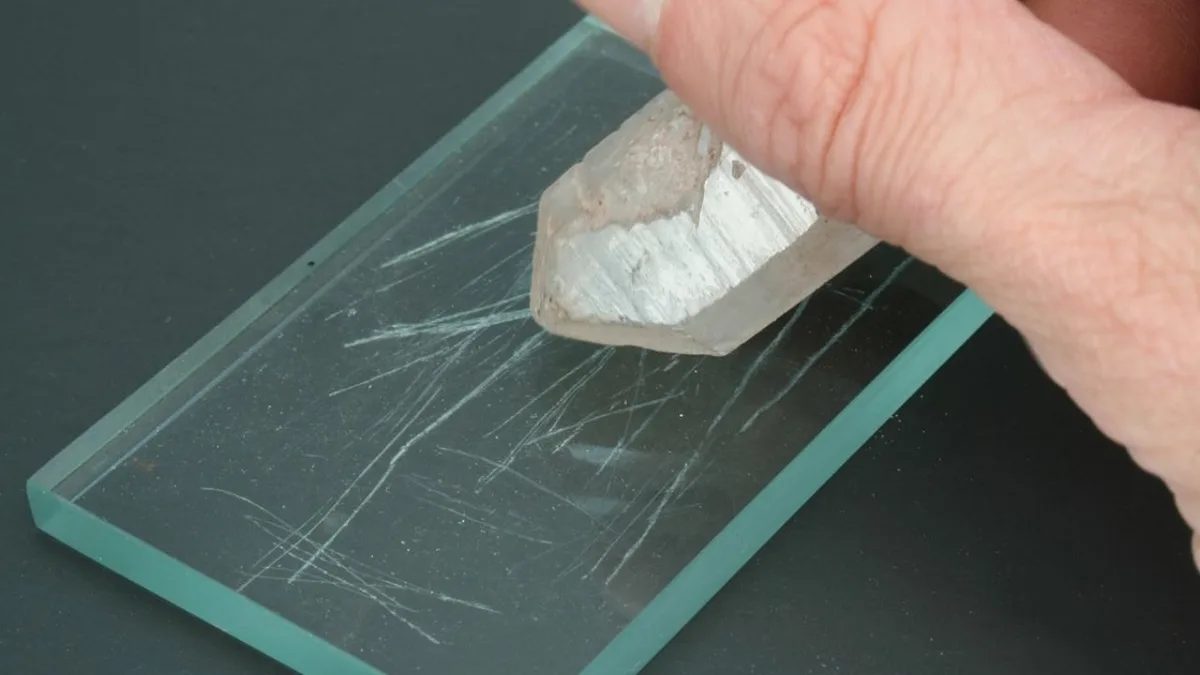
Image source: Bing (Web (fair-use with source credit))
These physical metrics provide quantitative backing to qualitative observations. Per GIA identification guidelines, combining multiple tests reduces error margins. Don’t skip these steps if accuracy matters.
A white streak alone isn’t proof of genuineness. It’s just the first filter.
Visual Red Flags: Veining, Bubbles, and Color Zoning
Even if the streak passes, inspect the structure under magnification. Natural amazonite displays irregular, feathery inclusions. These are fluid-filled fractures or mica flakes.
They look organic and chaotic. Dyed howlite often shows uniform color saturation.
Look for "color zoning." In real stones, intensity varies naturally along crystal planes. Fakes frequently concentrate dye in cracks. This creates dark spiderweb patterns.
While natural stones have veins, they aren’t usually filled with excess pigment. The contrast between vein and host rock is key.
Check for bubbles. Glass imitations trap air during manufacturing. Spherical voids are invisible in crystals.
If you see round pockets under 10x magnification, it’s synthetic. Also, observe the luster. Amazonite has a vitreous to pearly sheen.
Plastic composites often look waxy or dull.
- Irregular Banding: Natural growth patterns vary in width and direction.
- Crack Filling: Excess dye pooling in fissures suggests treatment.
- Surface Texture: Rough patches indicate porous howlite; smooth implies dense feldspar.
- Light Transmission: Hold up to bright light. Real amazonite transmits unevenly due to internal structures.
Aggregate reviews report that many buyers miss subtle bubble clusters. Take your time with this step. Rushing leads to false negatives.
Document your findings with photos if reselling. Transparency builds trust with future customers.
Step-by-Step Authentication Workflow for Beads and Rough Stones
Follow this sequence to minimize error. Start with visual inspection. Look for obvious bubbles or uniform dye pooling.
If those are absent, proceed to the streak test. Use an unglazed porcelain tile. Rub the stone firmly for five seconds.
Observe the powder color immediately.
Next, perform the hardness check. Find a hidden spot, like inside a bead hole. Press a steel needle against it.
Note any scratching. Finally, weigh the item if possible. Compare density against standard values.
Record all three results together. A single outlier suggests fraud. Consistency across all tests confirms authenticity.
This workflow saves time and money. It prevents costly misidentifications in your collection.
Common Pitfalls That Fool Even Experienced Collectors
Don’t assume a white streak guarantees natural origin. Some high-quality dyes are colorfast. They resist immediate release on the plate.
Always extend the rubbing duration. Pressure matters too. Light touches won’t grind enough powder.
You need firm, consistent force. Another mistake is ignoring surface coatings. Wax or resin seals hide dye.
Scrape gently before testing.
Also, beware of composite stones. Glue can bond real fragments to fake bases. The top might streak white correctly.
But the bottom reveals the truth. Test multiple areas if possible. Never rely on one data point.
Context is everything in gemology. A skilled eye catches inconsistencies others miss. Stay skeptical until proven otherwise.
Frequently Asked Questions
Can I damage my jewelry with the streak test?
Yes, if done carelessly. The abrasive nature of porcelain can scratch polished surfaces. Always choose an inconspicuous area.
Inside a bead hole or under a setting works best. For loose rough stones, risk is minimal. Clean the stone afterward to remove residue.
Avoid testing valuable finished pieces unless necessary. Consider non-destructive methods first. Magnification and weight checks are safer alternatives.
Reserve the streak test for ambiguous cases only.
Why does dyed howlite sometimes leave a white streak?
Sealants prevent dye release. Manufacturers coat porous stones with wax or polymer. This barrier stops pigment from transferring to the plate.
Heat or scraping removes the sealant temporarily. Then the true colored streak appears. Deep penetration dyes may also resist initial friction.
Extended rubbing reveals the underlying color. Always verify with hardness tests. Howlite scratches easily; amazonite does not.
Combining methods ensures accurate identification every time.
Is glass always easier to identify than dyed stone?
Generally, yes. Glass lacks crystalline structure. It often contains spherical bubbles.
These are visible under 10x magnification. Glass also feels colder initially. It has higher thermal conductivity.
On the streak plate, glass scratches instead of powdering. No colored dust forms. However, some "cat's eye" glasses mimic chatoyancy.
Check for fibrous inclusions carefully. True feldspar shows irregular banding. Synthetic versions look too perfect.
Visual cues remain vital alongside physical tests.
What if the streak is pale blue but faint?
This indicates partial dyeing or low concentration. Trace amounts of pigment exist within pores. The base material might still be howlite.
Confirm with hardness testing. Softness proves it isn't amazonite. Faint streaks require good lighting.
Daylight helps distinguish subtle hues. Artificial light distorts colors. Use a loupe to examine particle size.
Natural minerals produce fine, even powder. Dyes often clump or smear unevenly. Trust your senses but verify with tools.
Step-by-Step Authentication Workflow for Beads and Rough Stones
Start with a clean workspace. Dust interferes with streak visibility. Use a soft cloth to wipe the stone first.
This removes surface oils that might mask dye release. Next, select your testing spot carefully. For beads, choose the interior of the hole.
It’s hidden but accessible. For rough stones, pick a flat, unpolished face. Avoid any visible fractures or inclusions initially.
You want a representative sample of the bulk material.
Apply firm, consistent pressure against the unglazed tile. Rub back and forth for about ten seconds. Don’t just glide; grind slightly.
This friction generates the necessary powder. Stop and inspect the line immediately. Natural daylight is crucial here.
Indoor lighting often casts yellow tones. These can mimic faint iron stains. If you see white or light gray, note it down.
Any blue, green, or teal residue flags a fake.
Follow up with the hardness check. Take a steel nail or knife blade. Press it gently into the same tested area.
Real microcline feldspar resists scratching at Mohs 6. Howlite yields easily at Mohs 3.5. If the nail leaves a mark, discard the piece.
It’s too soft for durable jewelry. Finally, weigh the item if precision matters. Compare its specific gravity to standard values.
Deviations suggest resin filling or composite materials. Document each step in your log. Consistency builds reliability over time.
This workflow minimizes subjective error. It turns guesswork into data-driven decisions.
Common Pitfalls That Fool Even Experienced Collectors
Assuming a white streak proves authenticity is dangerous. Some high-quality dyes are colorfast. They resist immediate release on the plate.
Extended rubbing reveals the truth slowly. Always increase duration if results seem ambiguous. Another trap is ignoring surface sealants.
Wax or resin coatings block dye transfer. Scrape gently before testing to break the barrier. Heat can also soften these seals temporarily.
Without this prep, you’ll get false negatives.
Composite stones present unique challenges. Glue bonds real fragments to fake bases. The top layer might streak correctly.
But the bottom reveals synthetic materials. Test multiple areas whenever possible. Never rely on a single data point.
Context matters more than isolated facts. A skilled eye catches inconsistencies others miss. Stay skeptical until proven otherwise by cross-checks.
Lighting errors skew perception frequently. Artificial lights distort subtle hues. Yellow bulbs make white look cream.
Fluorescents add a blue cast. Always use natural sunlight for final checks. Magnification helps distinguish fine powder from smears.
Natural minerals produce even, dry dust. Dyes often clump or appear wet. Trust your senses but verify with tools.
Rushing leads to costly mistakes. Take your time with each specimen. Patience pays off in accurate identification.
Remember, no single test is infallible. Combine methods for robust conclusions. This approach protects your investment effectively.

Similar Posts